Adapt Quantum EDGE to your needs with our SDK
Authors: Alex Lidiak, Dominic Lennon
August 2025
Introducing the Quantum EDGE SDK: Faster, Smarter, More Flexible Automation
Today, we’re excited to announce Quantum EDGE SDK, a powerful new addition to the Quantum EDGE platform which gives you full control over your automation. This powerful new framework unlocks an entirely new layer of flexibility, allowing users to integrate their own code, connect custom hardware, and iterate faster than ever before.
Choose any library with any control electronics – the power is at your fingertips, take control using our intuitive code.
Why We Built the SDK
Every automation environment is different. Whether you’re orchestrating a lab, improving QPU designs, or deploying a quantum computing system, no two setups are the same. Until now, automation frameworks were not flexible enough to fit those unique demands.
The Quantum EDGE SDK changes that by giving you a programmable interface right inside the platform. Now you can write, run and evolve your own code directly within Quantum EDGE, live and in context, with all the benefits of our core automation engine and integrated automation solutions.
Now let’s take a look at how this plays out in real scenarios.
Real-World Use Cases Enabled by the Quantum EDGE SDK
Scenario:
You’ve just received a new QPU and you also received a spec sheet with simulated estimates of the device properties. You’d like to measure the relaxation time or T1 of each qubit in your device. You start by calibrating a drive pulse that will excite your ground states, i.e. an X gate, so you can observe their rate of relaxation. You find this by running a power rabi experiment whereby you vary the frequency and amplitude of the qubit drive pulse and measure the qubit’s nearest readout oscillator watching out for dispersive shifts due to qubit state transitions. While Quantum EDGE’s prebuilt automation solutions include Rabi, with Quantum EDGE’s SDK, you can write your own variation of the Rabi experiment for any instrument set and in any instrument code you prefer. To begin, you simply inherit from the CustomNode class and define how your node will run. Furthermore, you can leverage our Parameter Manager directly within your custom nodes – easily loading, saving, or processing the parameters of your quantum system and experiments – defined however you see fit! A typical CustomNode will have the following features and steps:
def run(self):
    component_parameters = ParameterSetAccessor(parameter_set_name="components")

    # Configure, Setup, Start Instuments - setup for experiment
    system = self.start_system(config_path)

    # Run your instrument code
    exp_data = self.run_experiment(system)

    # Analyze and process your results
    analysis = self.analyze(exp_data)

    # Plot your data
    self.plot(exp_data, analysis)

    # Save/update your new parameters for component
    component_parameters.new_parameter[{"component": self.component.name}] =
        analysis.parameter_update
The first two methods or sections will vary greatly from one system, the instrument setup and QPU, to another. Now let’s see how we could define the run_experiment method of a custom Rabi node with a few different instrument code examples:
def run_experiment(self, system):
    # Note: these can be defined as node settings, they're hardcoded here for simplicity
    sweep_start = 0.0
    sweep_end = 1.0
    num_steps = 200
    num_shots = 1000

    quantum_device =system["quantum_device"]
    meas_ctrl = system["meas_ctrl"]
    qubit = quantum_device.get_element(self.component.name)

    amp = ManualParameter(name="amp", unit="", label="Amplitude")
    amp.batched = True

    def rabi_sched(pulse_amps: np.ndarray, qubit: str, repetitions: int = 1):
        sched = Schedule("rabi_amplitude", repetitions=repetitions)
        for acq_idx, pulse_amp in enumerate(pulse_amps):
            sched.add(Reset(qubit))
            sched.add(X(qubit, amp180=pulse_amp))
            sched.add(Measure(qubit, acq_index=acq_idx), rel_time=20e-9)
        return sched

    gettable = ScheduleGettable(
        quantum_device,
        schedule_function=rabi_sched,
        schedule_kwargs={"qubit": qubit.name, "pulse_amps": amp},
        real_imag=False,
        batched=True,
    )
    meas_ctrl.gettables(gettable)

    pulse_amps = np.linspace(sweep_start, sweep_end, num_steps)

    meas_ctrl.settables(amp)
    meas_ctrl.setpoints(pulse_amps)

    quantum_device.cfg_sched_repetitions(num_shots)
    return meas_ctrl.run("rabi")
def run_experiment(self, system):
    sweep_start = 0.0
    sweep_end = 1.0
    num_shots = 1000
    num_steps = 200
    amplitudes = np.linspace(sweep_start, sweep_end, num_steps)
    thermalization_time = 100000

    # Select the drive line
    drive_line = self.component.name + "_drive"

    # Write a qua program that implements the experiment
    u = unit()
    with program() as power_rabi:
        n = declare(int)
        a = declare(fixed)
        I = declare(fixed)
        Q = declare(fixed)
        I_st = declare_stream()
        Q_st = declare_stream()
        n_st = declare_stream()

        with for_(n, 0, n < num_shots, n + 1):
            with for_(*from_array(a, amplitudes)):
                play("pi" * amp(a), drive_line)
                align(drive_line, "readout_res")
                measure(
                    "readout",
                    "readout_res",
                    None,
                    dual_demod.full("rotated_cosine_weights", "rotated_sine_weights", I),
                    dual_demod.full("rotated_minus_sine_weights", "rotated_cosine_weights", Q),
                )
                wait(int(thermalization_time * u.ns), "readout_res")
                save(I, I_st)
                save(Q, Q_st)
            save(n, n_st)

        with stream_processing():
            I_st.buffer(len(amplitudes)).average().save("I")
            Q_st.buffer(len(amplitudes)).average().save("Q")
            n_st.save("iteration")

    # Connect to the Quantum Machine and execute the experiment
    qmm = QuantumMachinesManager(host="10.0.7.166", port=None, cluster_name="my_cluster", octave=system["octave_config"])
    qm = qmm.open_qm(system["config"])

    job = qm.execute(power_rabi)

    # Fetch the data
    results = fetching_tool(job, data_list=["I", "Q", "iteration"], mode="live")
    while results.is_processing():
        I, Q, iteration = results.fetch_all()
        I, Q = u.demod2volts(I, readout_len), u.demod2volts(Q, readout_len)
    qm.close()

    return amplitudes[1:], (I + Q*1j)[1:] # x_data, y_data in analyze
Meanwhile the analyze method including an update to the Parameter Set might look like:
def analyze(self, rabi_data):
    # Perform analysis
    rabi_analysis = RabiAnalysis(
        tuid=rabi_data.attrs["tuid"], dataset=rabi_data, plot_figures=False).run()
    rabi_analysis.analyze_fit_results()

    # Update parameters
    component_parameters.pi_pulse_amplitude[{"component": self.component.name}] =
        rabi_analysis.quantities_of_interest["Pi-pulse amplitude"].nominal_value
def analyze(self, x_data, y_data):
    opt_amp = float(x_data[np.argmin(y_data)])
    component_parameters.pi_pulse_amplitude[{"component": self.component.name}] = opt_amp
You then run your Rabi experiment by adding it to the Quantum EDGE node library, simply by placing your newly created node in the custom node directory, and call the node when constructing your workflow as below:
from qo_edge.core.workflow.evaluator_utils import get_qubits_
from qo_edge.core.workflow.workflow_generator import workflow
from qo_edge.custom.custom_nodes.qblox.custom_rabi import CustomRabi

def build_t1_workflow():
    with workflow(workflow_name="rabi") as flow:
        with workflow(workflow_name="qubit loop", loop_function=get_qubits_) as flow2:
            flow2.add_node(CustomRabi, name="power rabi")
        flow.add_node(flow2, name="loop qubits")
    return flow()
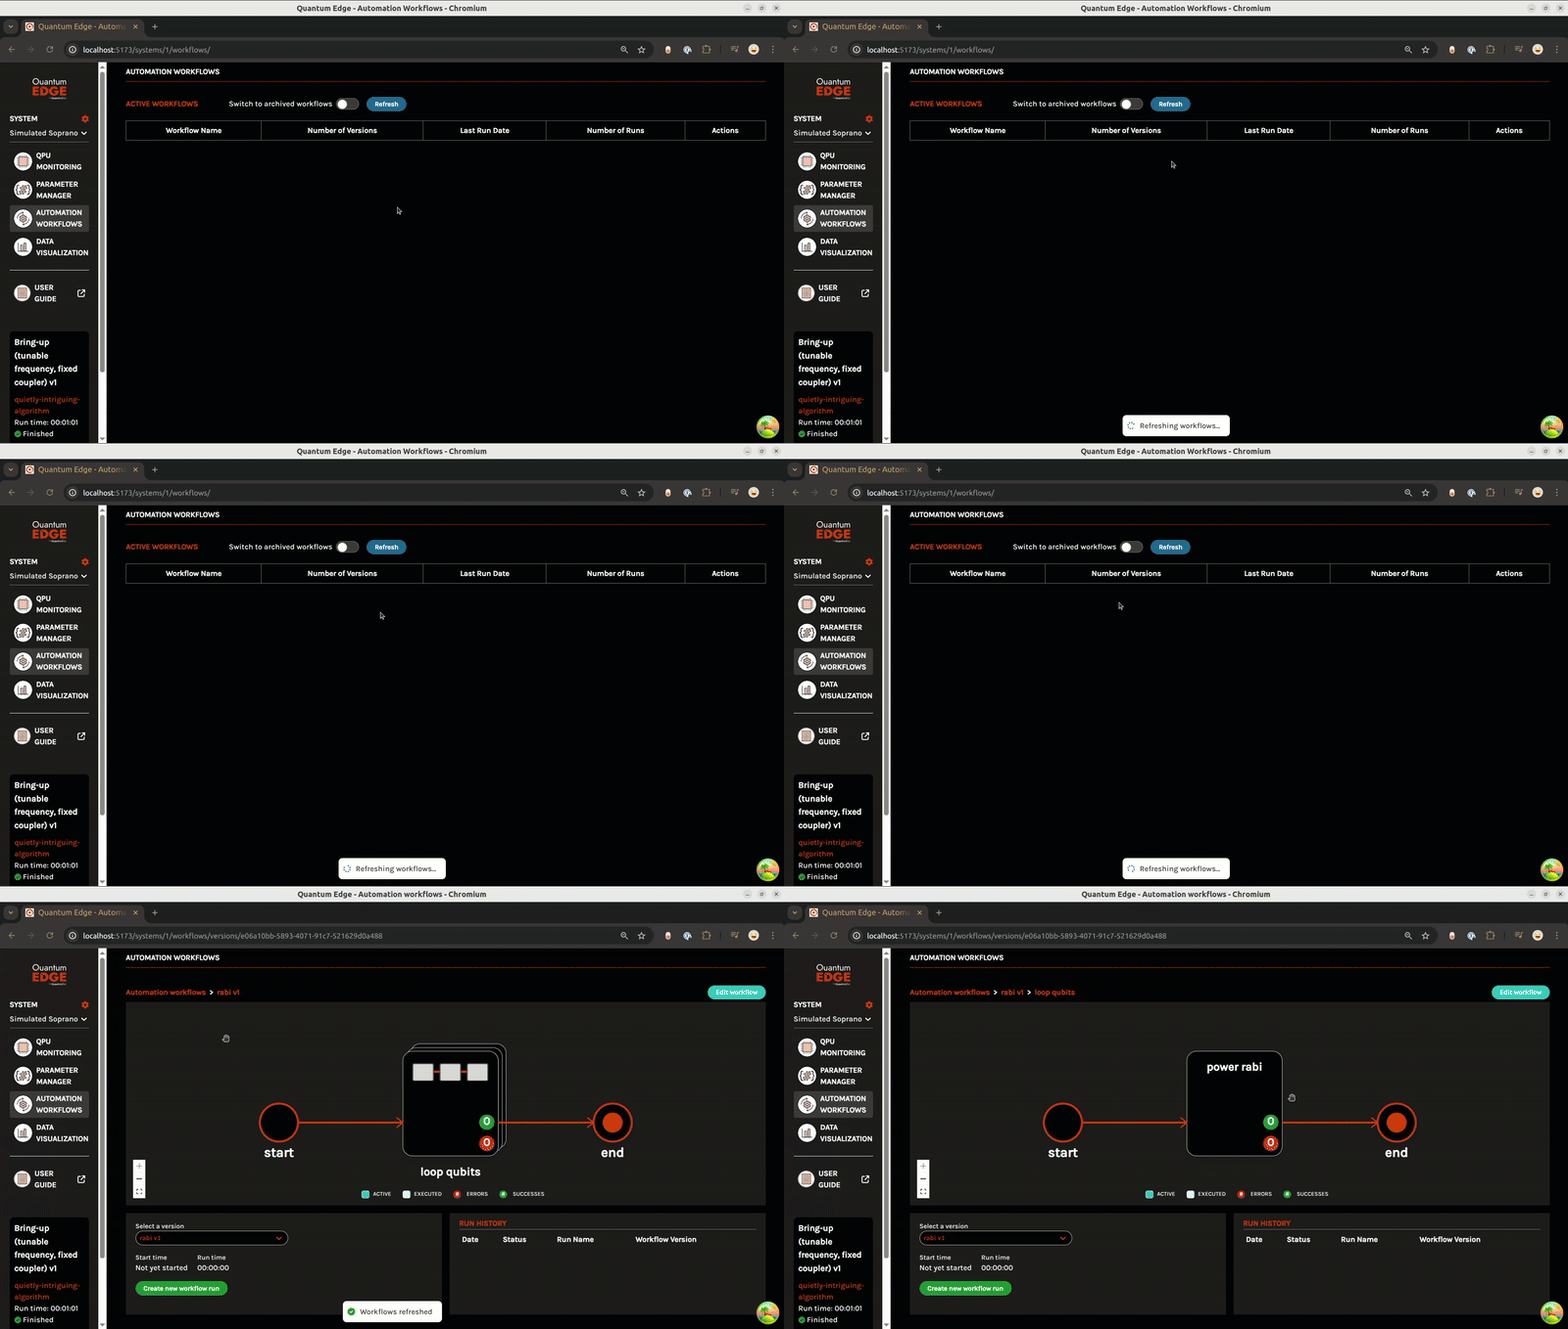
With this new workflow defined in your Quantum EDGE workflow library, also a directory, you can simply press the refresh button in the automation workflows page, refresh the site, and your new workflow will appear!

After you run your workflow using the create new workflow run button, and take a look at your data, you observe the following:

Looks like your Rabi experiment worked on qubit 2! But there’s something off about qubit 1. The simulation estimates of the properties of your device inform you that your qubits’ ground to excited state resonate frequencies start at 5 GHz with 0.5 GHz spacing between each qubits’ frequency, but better check this assumption. To easily check, we can import and add a Qubit Spectroscopy node from the Quantum EDGE node library (the nodes of which are compatible with multiple instruments including Qblox, Quantum Machines, and Zurich Instruments) to our workflow with one line:
flow2.add_node(QE_QubitSpectroscopy, name="qubit spec")
After adding this to our workflow we can refresh the workflow page and run the workflow again. We get:

Now we see why Rabi failed for QB1 and succeeded for QB2! QB1’s frequency was much further off the expected 5 GHz than the QB2’s frequency is from the expected 5.5 GHz. Now with the improved qubit frequency estimate, the custom Rabi experiment performs much better:

Now, we can add the relaxation or T1 measurement experiment. Again we can leverage an existing Quantum EDGE node with a single line of python as follows:
flow2.add_node(QE_Relaxation, name="relaxation")
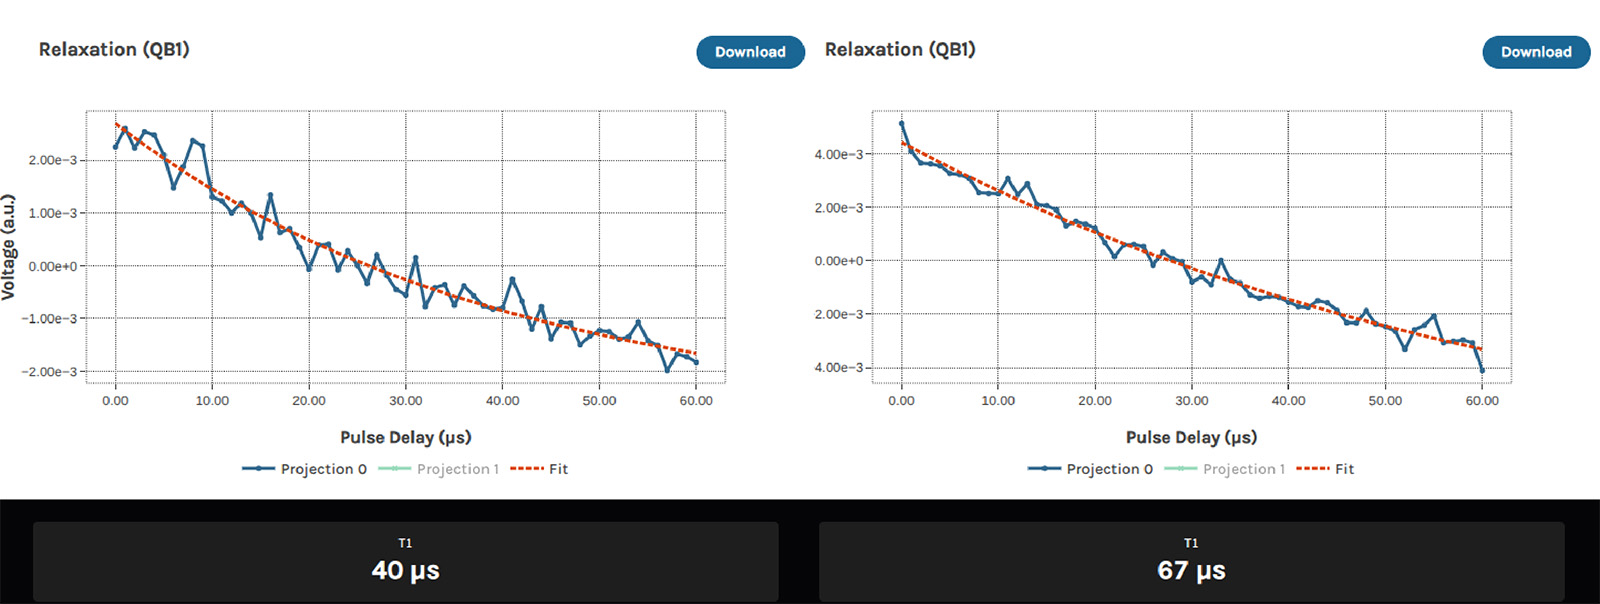
With the improvement in the qubit frequency estimation from the qubit spectroscopy node, the T1 of QB1 improves significantly:

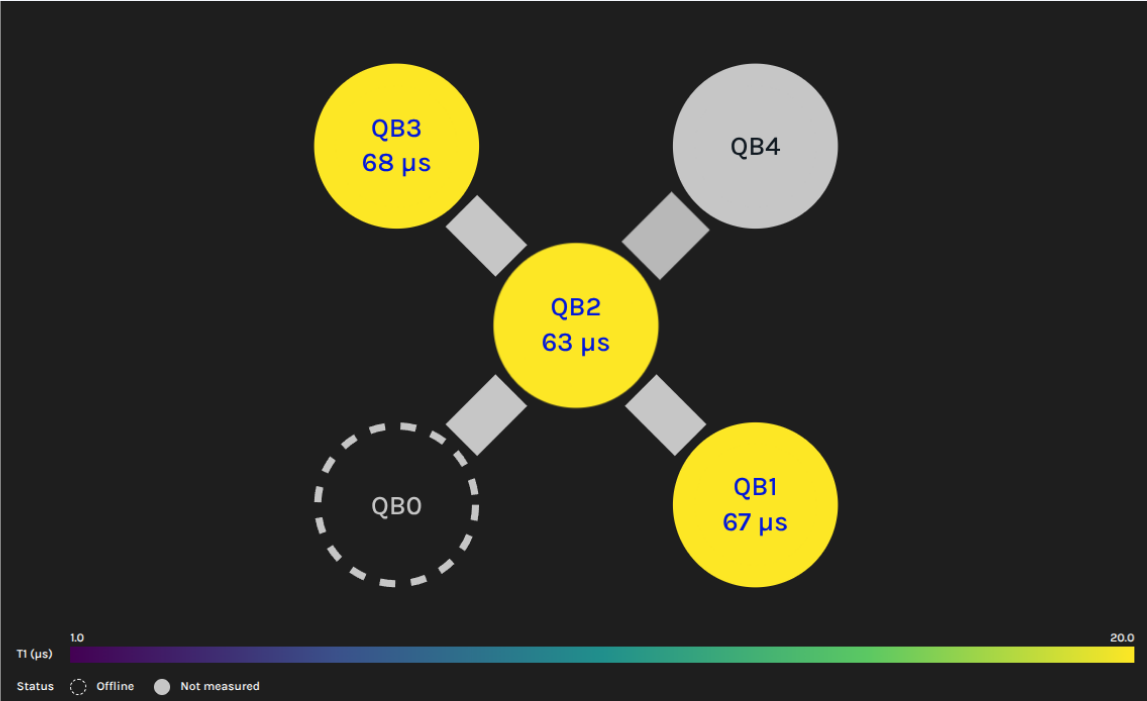
We can observe our results in the QPU Monitoring screen:

Using the Quantum EDGE SDK, we’ve just created and run our own custom node and seamlessly integrated it into a complex workflow to recover the T1 of our qubits and visualized everything from within the Quantum EDGE UI! With the Quantum EDGE SDK, we are able to quickly and easily test and iterate code, leverage existing Quantum EDGE nodes, and integrate custom instruments – all within the growing Quantum EDGE suite!
Get Started Today
We’re gradually rolling out the Quantum EDGE SDK over the next 6 months starting with existing customers. Take control of your automation and book a demo of Quantum EDGE today.
